TA的每日心情 | 奋斗
2013-2-28 11:51 |
|---|
签到天数: 49 天 连续签到: 1 天 [LV.5]常住居民I
|
最近事情太多,已经有将近一个礼拜没有摆弄LM4F Launchpad了,
今天中午抽空,再一次开启CCS,摆弄摆弄,这次我们主要研究LM4F的UART
及UART中断接收方式的使用。
我们依旧使用CCS作为开发平台,首先创建工程,如下图所示:

创建完工程后,配置Include目录及导入lib文件,这在之前的帖子中已经有详述,
需要的朋友可以查看一下我以前的帖子,有问题可以站内发信给我。
工程创建完后,创建一个uart.c文件,如下图所示:

好了,至此我们可以正式开始今天的实验了。
首先键入我们要用到的头文件:
#include "inc/hw_ints.h"
#include "inc/hw_memmap.h"
#include "inc/hw_types.h"
#include "driverlib/debug.h"
#include "driverlib/fpu.h"
#include "driverlib/gpio.h"
#include "driverlib/interrupt.h"
#include "driverlib/pin_map.h"
#include "driverlib/rom.h"
#include "driverlib/sysctl.h"
#include "driverlib/uart.h"
由于我们需要使用中断,因而需要在startup_css.c中配置好uart0的中断函数

如上图所示,我们的uart0中断子程序名称为UARTIntHandler,同时
在startup_css.c文件顶部加入:extern void UARTIntHandler(void);
用以表明该函数将在其他地方声明,在本次实验中,我们将该函数定义在uart.c中。
切换回uart.c,加入uart0中断处理程序
//*****************************************************************************
//
// The UART interrupt handler.
//
//*****************************************************************************
void
UARTIntHandler(void)
{
unsigned long ulStatus;
//
// Get the interrrupt status.
//
ulStatus = ROM_UARTIntStatus(UART0_BASE, true);
//
// Clear the asserted interrupts.
//
ROM_UARTIntClear(UART0_BASE, ulStatus);
//
// Loop while there are characters in the receive FIFO.
//
while(ROM_UARTCharsAvail(UART0_BASE))
{
//
// Read the next character from the UART and write it back to the UART.
//
ROM_UARTCharPutNonBlocking(UART0_BASE,
ROM_UARTCharGetNonBlocking(UART0_BASE));
//
// Blink the LED to show a character transfer is occuring.
//
GPIOPinWrite(GPIO_PORTF_BASE, GPIO_PIN_2, GPIO_PIN_2);
//
// Delay for 1 millisecond. Each SysCtlDelay is about 3 clocks.
//
SysCtlDelay(SysCtlClockGet() / (1000 * 3));
//
// Turn off the LED
//
GPIOPinWrite(GPIO_PORTF_BASE, GPIO_PIN_2, 0);
}
}
串口发送程序:
//*****************************************************************************
//
// Send a string to the UART.
//
//*****************************************************************************
void
UARTSend(const unsigned char *pucBuffer, unsigned long ulCount)
{
//
// Loop while there are more characters to send.
//
while(ulCount--)
{
//
// Write the next character to the UART.
//
ROM_UARTCharPutNonBlocking(UART0_BASE, *pucBuffer++);
}
}
主程序:
//*****************************************************************************
//
// This example demonstrates how to send a string of data to the UART.
//
//*****************************************************************************
int
main(void)
{
//
// Enable lazy stacking for interrupt handlers. This allows floating-point
// instructions to be used within interrupt handlers, but at the expense of
// extra stack usage.
//
ROM_FPUEnable();
ROM_FPULazyStackingEnable();
//
// Set the clocking to run directly from the crystal.
//
ROM_SysCtlClockSet(SYSCTL_SYSDIV_1 | SYSCTL_USE_OSC | SYSCTL_OSC_MAIN |
SYSCTL_XTAL_16MHZ);
//
// Enable the GPIO port that is used for the on-board LED.
//
ROM_SysCtlPeripheralEnable(SYSCTL_PERIPH_GPIOF);
//
// Enable the GPIO pins for the LED (PF2).
//
ROM_GPIOPinTypeGPIOOutput(GPIO_PORTF_BASE, GPIO_PIN_2);
//
// Enable the peripherals used by this example.
//
ROM_SysCtlPeripheralEnable(SYSCTL_PERIPH_UART0);
ROM_SysCtlPeripheralEnable(SYSCTL_PERIPH_GPIOA);
//
// Enable processor interrupts.
//
ROM_IntMasterEnable();
//
// Set GPIO A0 and A1 as UART pins.
//
GPIOPinConfigure(GPIO_PA0_U0RX);
GPIOPinConfigure(GPIO_PA1_U0TX);
ROM_GPIOPinTypeUART(GPIO_PORTA_BASE, GPIO_PIN_0 | GPIO_PIN_1);
//
// Configure the UART for 115,200, 8-N-1 operation.
//
ROM_UARTConfigSetExpClk(UART0_BASE, ROM_SysCtlClockGet(), 115200,
(UART_CONFIG_WLEN_8 | UART_CONFIG_STOP_ONE |
UART_CONFIG_PAR_NONE));
//
// Enable the UART interrupt.
//
ROM_IntEnable(INT_UART0);
ROM_UARTIntEnable(UART0_BASE, UART_INT_RX | UART_INT_RT);
//
// Prompt for text to be entered.
//
UARTSend((unsigned char *)"\033[2JEnter text: ", 16);
//
// Loop forever echoing data through the UART.
//
while(1)
{
}
}
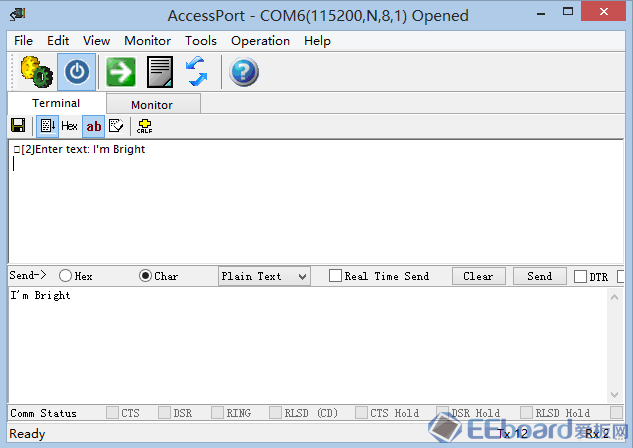
编译、下载到LM4F Launchpad后,打开串口调试助手,
设置波特率115200,8bit数据位,无校验,1位停止位
然后Reset我们的LM4F Launchpad,在串口调试助手上可以看到“Enter text”字样
我们随意在发送框键入字符,发送后,在接收窗口可以看到我们所发送的字符串。

本帖旨在引导大家进行开发的思路,更为细节的函数这里就不多赘述,大家在实际
开发过程中遇到问题的话,可以跟帖询问,我看到会回复的。
|
|
 /2
/2 
 /2
/2 