TA的每日心情 | 开心
2016-10-11 09:08 |
|---|
签到天数: 30 天 连续签到: 1 天 [LV.5]常住居民I
|
本帖最后由 kebao_1 于 2016-10-13 12:51 编辑
LinkSprite IO目前是支持RESTful API 的,我们可以通过让LinkNode D1连接到LinkSprite IO,可以对设备实现以下控制:
今天我们来通过LinkSprite IO 控制 LinkNode D1上面的LED
arduino IDE的环境,我建议大家用傻瓜包,比较省事:
百度云:傻瓜包168+2.3 密码:xamt
其中要用的的第三方wifi库:
https://github.com/tzapu/WiFiManager
下载zip的压缩包,并在ardhuino IDE 选择 项目=》导入库=》添加库
将压缩包添加到arduino IDE中
下来…………………………
1. 注册并登录 LinkSprite IO- 进入 www.linksprite.io,注册一个帐号并登录。
- 创建一个设备。
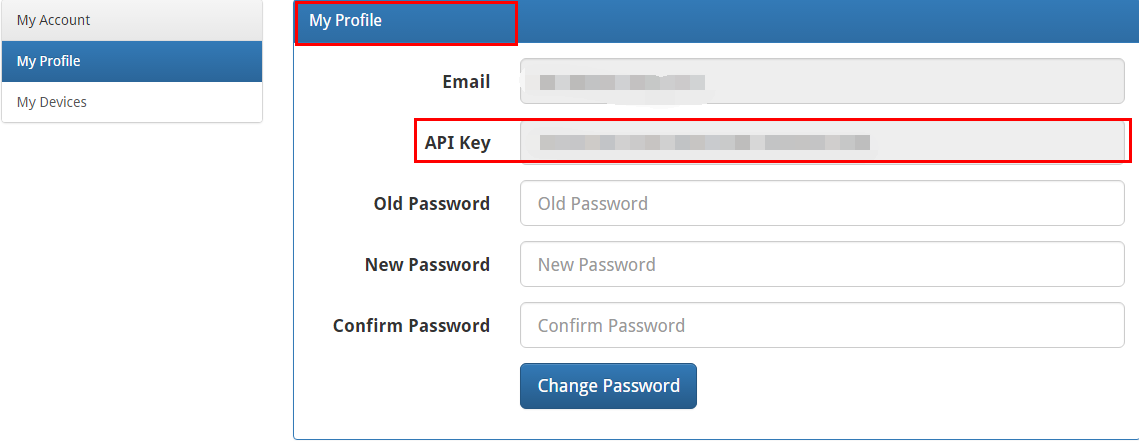
- 进入My Profile 获取“API Key”。

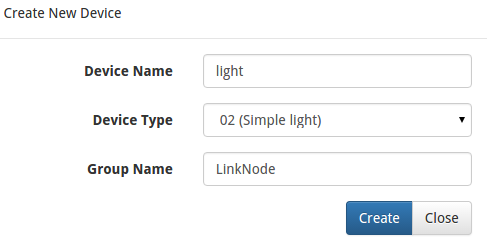
图1.6.1 获取API key - 点击“created DIY device”按钮,进入Create New Device,其中“Device Name”、“Group Name”可以任意,“Device Type”选02(Simple light),点击“Create”按钮,即可创建一个设备。

图1.6.2 创建一个设备
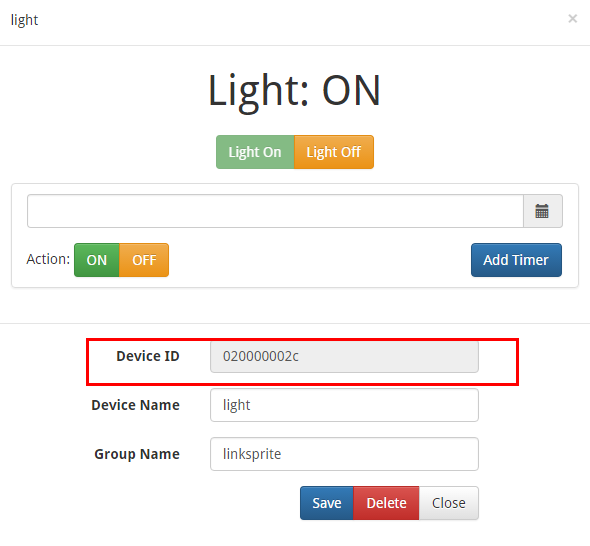
点击创建的设备,获取设备的“Device ID”。

图1.6.3 获取Device ID
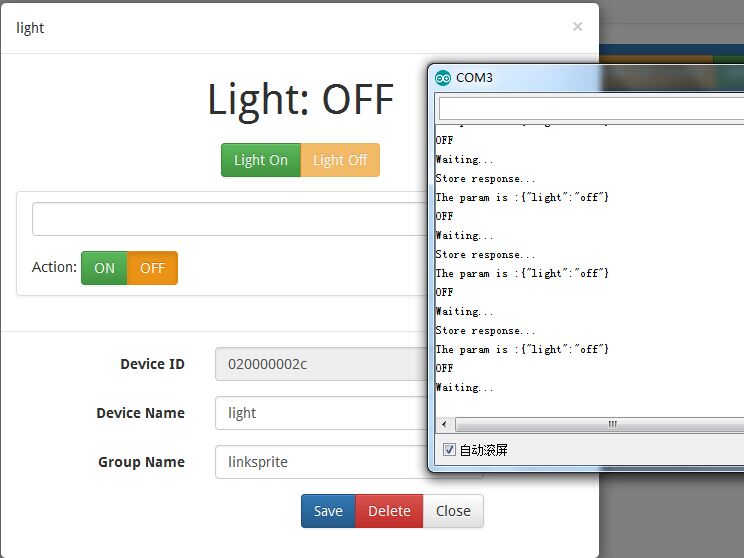
2.编译运行代码点击Linksprite IO 上的“Light On”和“Light Off”按钮,看LED灯的状态是否有所改变?串口监视器又打印什么信息?

这就是LED的 LinkSprite IO控制
不过,在这个教程中缺少一个环节,就是wifi manager库的wifi连接,或者说是LinkNode D1开发板连接互联网
在将程序烧入开发板上后,会出现一个叫:LinkNodeAP的wifi信号,连接上后进入浏览器10.0.1.1中,连接相应的wifi即可

这里要说明一下程序的流程:
wifimanager部分:- WiFiManager wifiManager;
- wifiManager.setAPStaticIPConfig(IPAddress(10,0,1,1), IPAddress(10,0,1,1), IPAddress(255,255,255,0));
- wifiManager.autoConnect("LinkNodeAP");
开发板程序:- if (client.connect(server,80)) {
- String postStr ="{";
- postStr +=""action":"query",";
- postStr +=""apikey":"";
- postStr += apikey;
- postStr +="",";
- postStr +=""deviceid":"";
- postStr += deviceID;
- postStr +="",";
- postStr += ""params":";
- postStr += "[";
- postStr += ""light"";
- postStr +="]";
- postStr +="}";
- client.print("POST /api/http HTTP/1.1\n");
- client.print("Host: ");
- client.print(server);
- client.print("\nContent-Type: application/json\n");
- client.print("Content-Length: ");
- client.print(postStr.length());
- client.print("\n\n");
- client.print(postStr);
- }
Request: <code class="json" data-origin="{ "action": "query", "deviceid": "01ad0253f2", "apikey": "123e4567-e89b-12d3-a456-426655440000", "params": [ "switch" ]}" style="box-sizing: border-box; font-family: Menlo, Monaco, Consolas, "Courier New", monospace; font-size: inherit; color: inherit; background-color: transparent; border-radius: 0px; white-space: pre-wrap;">{ "action": "query", "deviceid": "01ad0253f2", "apikey": "123e4567-e89b-12d3-a456-426655440000", "params": [ "switch" ]}
服务器的响应
开发板程序:- if (request!= NULL)
- {
- int index1 = request.indexOf(":{");
- int index2 = request.indexOf("},");
- String param = request.substring(index1, index2 + 1);
- Serial.print("The param is ");
- Serial.println(param);
- if(param.indexOf("off")>0){
- digitalWrite(BUILTIN_LED, HIGH);
- Serial.println("OFF");
- } else if(param.indexOf("on")>0){
- digitalWrite(BUILTIN_LED, LOW);
- Serial.println("ON");
- }
Response: <code class="json" data-origin="{ "error": 0, "deviceid": "01ad0253f2", "apikey": "123e4567-e89b-12d3-a456-426655440000", "params": { "switch": "on" }}" style="box-sizing: border-box; font-family: Menlo, Monaco, Consolas, "Courier New", monospace; font-size: inherit; color: inherit; background-color: transparent; border-radius: 0px; white-space: pre-wrap;">{ "error": 0, "deviceid": "01ad0253f2", "apikey": "123e4567-e89b-12d3-a456-426655440000", "params": { "switch": "on" }}在控制的过程会发现LED的亮灭会有2~3秒的延时,是程序设定如此!!!!!
总的来说,LinkSprite IO是很不错,简单,易用,但是功能很少,界面也不好看,但是我就喜欢这没花哨的,我尝试使用Blockly,但是对我来有点难度,只能慢慢来啦 |
|
 /2
/2 
 /2
/2 