原帖由发自dev.eefocus.com
MPLAB IDE环境可以在官网上下载,现在最新的是MPLAB X,但我用的是MPLAB IDE v8.85
我也迫不及待的写了一个简单的LED测试程序,在MPLAB IDE中运行还算良好,也下面给大家讲讲步骤和环境: 1.安装好MPLAB后,下载我的工程文件,解压并打开,直接运行“blinky_leds.mcp”工程文件,如下图


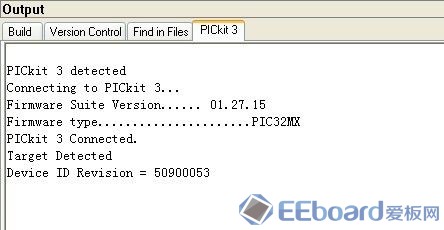
2.双击打开左边的“blinky_leds.c”文件后,选择顶栏的“Debugger”-》“Select Tool”,然后选择“2.PICkit 3”,连接正常后软件下方的区域会提示

注:要将PICkit3连接Uno32的JP3,注意管脚要1对1 3.先点软件的
 编译一下,然后点

图标“program”如下图提示

4.点击软件的

图标,运行程序!你会发现LED4,LED5在交替闪烁!
源码如下:
/********************************************************************* * * Example Binky LEDs * ********************************************************************* * FileName: blinky_leds.c * Dependencies: plib.h * * Processor: PIC32MX320(ChipKIT Uno32) * * Complier: MPLAB IDE v8.85 * * Company: Microchip Technology Inc. * * Software License Agreement * ********************************************************************* * $Name: ukonline2000 * ********************************************************************* * This program uses Exploer-16 to blink all of its LEDs at once. * * Platform: ChipKIT Uno32 with PIC32MX320F128H * ********************************************************************/ #include <plib.h>
// Configuration Bit settings // SYSCLK = 80 MHz (8MHz Crystal/ FPLLIDIV * FPLLMUL / FPLLODIV) // PBCLK = 40 MHz // Primary Osc w/PLL (XT+,HS+,EC+PLL) // WDT OFF // Other options are don't care // #pragma config FPLLMUL = MUL_20, FPLLIDIV = DIV_2, FPLLODIV = DIV_1, FWDTEN = OFF #pragma config POSCMOD = HS, FNOSC = PRIPLL, FPBDIV = DIV_8
#define SYS_FREQ (80000000L)
int main(void) { int i=0;
//~~~~~~~~~~~~~~~~~~~~~~~~~~~~~~~~~~~~~~~~~~~~~~~~~~~~~~~~~~~~~~~ //STEP 1. Configure cache, wait states and peripheral bus clock // Configure the device for maximum performance but do not change the PBDIV // Given the options, this function will change the flash wait states, RAM // wait state and enable prefetch cache but will not change the PBDIV. // The PBDIV value is already set via the pragma FPBDIV option above.. SYSTEMConfig(SYS_FREQ, SYS_CFG_WAIT_STATES | SYS_CFG_PCACHE);
// STEP 3.disabled the JTAG port. mJTAGPortEnable(DEBUG_JTAGPORT_OFF);
//~~~~~~~~~~~~~~~~~~~~~~~~~~~~~~~~~~~~~~~~~~~~~~~~~~~~~~~~~~~~~~~ // STEP 4. configure the port registers PORTSetPinsDigitalOut(IOPORT_F, BIT_0); //LED4 from ChipKIT Uno32 PORTSetPinsDigitalOut(IOPORT_G, BIT_6); //LED5 from ChipKIT Uno32 //mPORTFSetPinsDigitalOut( BIT_0 ); //mPORTGSetPinsDigitalOut( BIT_6 );
// STEP 5. initialize the port pin states = outputs low mPORTFClearBits( BIT_0 ); mPORTGClearBits( BIT_6 );
// Now blink all LEDs ON/OFF forever. while(1){ if(i<1024*1024*10) { mPORTGToggleBits(BIT_6); mPORTFClearBits(BIT_0 ); i++; } else{ mPORTGClearBits(BIT_6 ); mPORTFToggleBits(BIT_0); i++; } if(i>=1024*1024*20) i=0; } }
|  /4
/4 
 /4
/4 